⚡ What This Guide Covers
This step-by-step guide walks you through launching a live WordPress site on Cloudways from scratch — from signing up to going live with a custom domain and SSL. No prior server experience needed. The whole process takes about 20 minutes.
✅ You’ll learn: Create a Cloudways account → Launch a cloud server → Install WordPress → Connect your domain → Enable SSL → Optimize performance settings
Why Set Up WordPress on Cloudways?
Cloudways is one of the most popular managed cloud hosting platforms for WordPress — and for good reason. Instead of fighting with cPanel and shared server limitations, Cloudways gives you a fully managed cloud server running Nginx, PHP 8.x, and your choice of cloud infrastructure (DigitalOcean, Vultr, Google Cloud, AWS, or Linode). The platform handles server updates, security patches, and backups automatically, so you focus on WordPress, not sysadmin work.
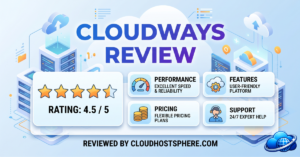
If you’re migrating from a slower shared host or building a new site and want performance from day one, Cloudways is one of the smartest moves you can make. Plans start at $14/mo on DigitalOcean and include a 3-day free trial — no credit card required. See our full Cloudways review for a deeper look at the platform.
What You Need Before You Start
Before jumping in, have these ready:
- A Cloudways account (free trial, no credit card needed)
- A domain name (you can register one at Namecheap, GoDaddy, or wherever you prefer)
- Your email address for account setup
- About 20 minutes
That’s genuinely it. Cloudways handles everything else on the server side.
Step 1: Create Your Cloudways Account
Head to cloudways.com and click Start Free. You can sign up with your email address or use Google/GitHub OAuth for faster registration.
During signup, Cloudways asks you to verify your email. After confirming, you’re dropped straight into the launch wizard — no waiting, no account approval delays.
💡 Free trial tip: The 3-day free trial gives you a live server with a test domain. You can build your entire site before entering payment details. Only add a card when you’re ready to go live with a real domain.
Step 2: Launch Your First Cloud Server
After logging in, you’ll see the “Launch” screen. This is where you choose your server configuration. Here’s what to select:
Choose Your Application
In the first dropdown, select WordPress. You’ll also see options like WooCommerce, Laravel, Magento — choose plain WordPress for a standard site. If you’re building a store, choose WooCommerce instead (it installs WordPress + WooCommerce together).
Choose Your Cloud Provider
This is the most important decision on this screen. Here’s a quick guide:
| Provider | Best For | Starting Price |
|---|---|---|
| DigitalOcean | Most users — great value, reliable | ~$14/mo |
| Vultr High Freq | Fast NVMe storage, good for media-heavy sites | ~$15/mo |
| Google Cloud | Maximum performance, enterprise-grade | ~$37/mo |
| AWS | Enterprise, global reach | ~$36/mo |
| Linode (Akamai) | Budget alternative, developer-friendly | ~$12/mo |
For most new sites and migrations: DigitalOcean 1GB ($14/mo) is the right starting point. You can scale up or switch providers later without losing data.
Choose Your Server Size
For a new WordPress blog or small business site: the 1 GB RAM / 1 vCPU / 25 GB SSD option is perfectly capable for sites with up to 30,000–50,000 monthly visitors. If you’re migrating a medium-traffic site or running WooCommerce, start with 2 GB RAM.
Choose Your Server Location
Pick a data centre closest to the majority of your audience. If your site is primarily US-based, New York or San Francisco work well. For UK/Europe visitors, London or Amsterdam. For Asia-Pacific, Singapore or Sydney. This reduces latency and improves page load time for your readers.
Once you’ve made your selections, click Launch Now. Cloudways spins up your server in about 5–10 minutes.
Step 3: Access Your WordPress Dashboard
Once the server is live, you’ll see it in your Cloudways dashboard under Servers. Click on your server, then click Applications — you’ll see your WordPress installation listed there.
Click on the application name. You’ll see several important details:
- Application URL: A temporary Cloudways URL (like
xxx.cloudwaysapps.com) — this is your site’s live URL until you connect your domain - Admin Panel URL: Direct link to your WordPress
/wp-admin/ - Username & Password: Your WordPress admin credentials (auto-generated — change these immediately)
Click Admin Panel to open your WordPress dashboard. Log in with the auto-generated credentials and immediately go to Users → Your Profile to change your password to something strong and memorable.
Step 4: Connect Your Custom Domain
Your temporary .cloudwaysapps.com URL works but you’ll want to connect your real domain before launching. Here’s how:
In Cloudways (Add the Domain)
- Go to your Application → Domain Management
- Click Add Domain and enter your domain (e.g.
yourdomain.com) - Set it as the Primary Domain
- Cloudways will show you the server IP address — copy it
In Your Domain Registrar (Point DNS)
- Log in to your domain registrar (Namecheap, GoDaddy, Cloudflare DNS, etc.)
- Find your domain’s DNS settings
- Create an A record: Host =
@, Value = your Cloudways server IP - Also create a CNAME record: Host =
www, Value =yourdomain.com - Save the records — DNS propagation takes 15 minutes to 48 hours (usually under 1 hour)
⏱️ Pro tip: Use Cloudflare as your DNS provider — it’s free, propagates DNS changes in seconds rather than hours, and you get a free CDN layer automatically. Just add your domain in Cloudflare, update your registrar’s nameservers to Cloudflare’s, then add the A record pointing to your Cloudways IP.
Step 5: Enable Free SSL (HTTPS)
Once your domain is pointing to your Cloudways server and DNS has propagated, enabling SSL takes about 30 seconds:
- In your Cloudways Application, go to SSL Certificate
- Enter your domain name in the field
- Toggle Let’s Encrypt SSL → ON
- Click Install Certificate
Cloudways provisions a free Let’s Encrypt SSL certificate automatically and handles renewals every 90 days — you never have to think about it again. Once SSL is active, your site loads on HTTPS and you’ll see the padlock in the browser bar.
Now go into your WordPress dashboard → Settings → General and update both the WordPress Address and Site Address to use https:// instead of http://.
Step 6: Update WordPress Settings
Before adding your theme or content, take 5 minutes to configure a few essential WordPress settings:
Permalinks
Go to Settings → Permalinks and select Post name (e.g. /your-post-title/). This gives you clean, SEO-friendly URLs. Save Changes — WordPress will configure the .htaccess rewrite rules automatically.
Site Title and Tagline
Go to Settings → General and set your site title and tagline. These appear in browser tabs and are used by SEO plugins as default fallbacks.
Timezone
Still in Settings → General, set your timezone to match your target audience or your own location. This affects scheduled post publishing times.
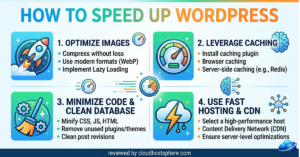
Step 7: Optimize Performance on Cloudways
Cloudways comes with several performance features that aren’t enabled by default. Here’s what to turn on:
Install and Configure Breeze Cache Plugin
Cloudways offers Breeze — their free, server-optimized WordPress cache plugin. Install it from Plugins → Add New → search “Breeze”. Once activated, go to Breeze → Basic Options and enable:
- Enable Cache
- Enable Gzip Compression
- Minify HTML, CSS, and JS
Enable Redis Object Cache
In your Cloudways Application dashboard, go to Application Management → Packages and enable Redis. Then install the Redis Object Cache plugin in WordPress and connect it. This dramatically reduces database queries for WooCommerce and dynamic sites.
Enable Cloudflare CDN (Free)
In Cloudways → Application → Cloudflare, you can enable the Cloudflare free CDN in one click (requires a Cloudflare account). This caches static assets globally, reducing load times for visitors far from your server location.
Step 8: Set Up Automated Backups
Cloudways includes automated server backups built into the platform. To configure them, go to your Server → Backups and set:
- Backup Frequency: Daily (or hourly on higher traffic sites)
- Backup Retention: 7 days minimum — more if storage allows
- Off-site backup: Consider enabling the optional external backup add-on to a separate S3 bucket for critical sites
Restoring from a Cloudways backup is a 2-click process from the dashboard — no SSH or command line needed.
Step 9: Install Essential Plugins
With your server configured and your domain live, add the essential plugin stack for a new WordPress site:
| Plugin | Purpose | Free? |
|---|---|---|
| Rank Math SEO | SEO meta, sitemaps, schema | ✅ Free tier |
| Wordfence Security | Firewall, malware scanner | ✅ Free tier |
| UpdraftPlus | Off-site backup to Google Drive | ✅ Free tier |
| WP Rocket (or Breeze) | Page caching and performance | WP Rocket is paid; Breeze is free |
| ShortPixel | Image compression | ✅ 100 images/mo free |
| ThirstyAffiliates | Affiliate link management | ✅ Free tier |
You’re Live: What to Do Next
With your WordPress site live on Cloudways, your domain connected, SSL active, and caching configured, you’re running on a proper managed cloud setup. Here’s what to do next:
- Submit your sitemap to Google Search Console (
yourdomain.com/sitemap_index.xml) to get indexed faster - Install your theme — Astra, GeneratePress, or Kadence are the fastest free themes for Cloudways
- Run a speed test on GTmetrix or PageSpeed Insights to establish a baseline before adding content
- Set up Cloudflare if you haven’t already — it’s free and makes a measurable difference
Need help migrating an existing site to Cloudways? See our guide on How to Migrate WordPress to a New Host — it covers Cloudways migrations specifically.
Start Your Cloudways Free Trial
Cloudways offers a 3-day free trial — no credit card required. You can build your entire site on a live cloud server and only enter payment details when you’re ready to go live. Plans start at $14/mo on DigitalOcean.
Start Free Trial on Cloudways →
Affiliate disclosure: This is an affiliate link. If you sign up, we may earn a commission at no extra cost to you. Learn more.