Published: May 30, 2026 | By CloudHostSphere Editorial Team
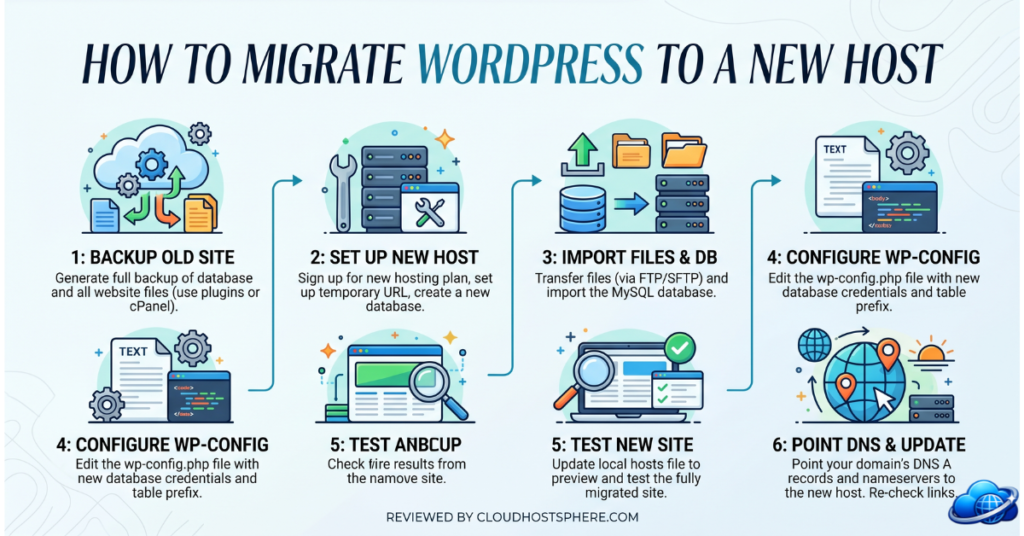
Migrating WordPress to a new host is one of those tasks that sounds more complicated than it is — but only if you know the right process. Done correctly, you can move a live WordPress site to a completely new hosting provider with zero downtime and no data loss. This guide walks you through the complete migration process step by step, from backup through DNS switchover, using both the manual method and the easiest plugin-based approach.
⏱️ Time required: 30–90 minutes depending on site size and method used.
🛠️ Technical level: Beginner-friendly with plugin method; intermediate with manual method.
📋 What you need: Access to your current and new hosting accounts, your domain registrar, and a browser.
Before You Start: Choose Your New Host
The migration process is the same regardless of which host you move to, but your choice of destination host affects the tools available to you. Many managed WordPress hosts offer free migration services where their team handles the entire move for you:
- LiquidWeb — free migration included on all managed WordPress plans; handled by Heroic Support engineers
- Kinsta — free migrations handled by WordPress experts on all plans
- Cloudways — free WordPress migration plugin plus paid Cloudways migration service available
- Hostinger — free migration available on Business and Cloud plans
If your new host offers free migrations, contact their support and let them do it. This guide is for teams who prefer to migrate themselves, want to understand the process, or are moving to a host that doesn’t offer free migrations.
Method 1: Plugin-Based Migration (Recommended for Beginners)
The easiest way to migrate WordPress with zero downtime is using the Duplicator Pro or All-in-One WP Migration plugin. We’ll walk through Duplicator Pro as it handles large sites most reliably.
Step 1: Install Duplicator on Your Current Site
- In WordPress Admin → Plugins → Add New → search “Duplicator”
- Install and activate Duplicator (free version works for most sites under 500 MB)
Step 2: Create a Package (Your Site Backup)
- Go to Duplicator → Packages → Create New
- Click Next through the scan results (resolve any Warnings before proceeding)
- Click Build — Duplicator creates two files: an Installer (.php) and an Archive (.zip)
- Download both files to your computer
Step 3: Set Up WordPress on the New Host
- Log in to your new hosting control panel
- Create a new database and database user (note the name, username, and password)
- Upload the Installer.php and Archive.zip files to the root of your new hosting account via FTP, SFTP, or the File Manager
Step 4: Run the Installer
- In your browser, visit:
http://your-new-host-ip-or-temp-url/installer.php - Enter the database credentials you created in Step 3
- Follow the on-screen steps — Duplicator extracts the archive and configures WordPress automatically
- Log in to WordPress on the new host to verify everything works
Method 2: Manual Migration
Manual migration gives you complete control and works for any site size. It involves four parts: backing up your files, exporting your database, uploading to the new host, and updating your configuration.
Step 1: Back Up Your WordPress Files
Connect to your current host via FTP/SFTP (use FileZilla, Cyberduck, or your host’s File Manager). Download your entire WordPress directory — typically /public_html/ or /www/. This includes your wp-content folder (themes, plugins, uploads), wp-config.php, and all core WordPress files.
Step 2: Export Your Database
- Log in to phpMyAdmin via your current host’s control panel
- Select your WordPress database from the left sidebar
- Click Export → Quick → Go
- Save the .sql file to your computer
Step 3: Create Database on New Host
- In your new host’s control panel, create a new MySQL database
- Create a database user and assign it to the database with All Privileges
- Import your .sql file via phpMyAdmin on the new host (Database → Import → Choose File)
Step 4: Upload Files and Update wp-config.php
- Upload your WordPress files to the new host via FTP/SFTP
- Edit
wp-config.phpand update:DB_NAME,DB_USER,DB_PASSWORD, andDB_HOSTto match your new host’s database details - Save and upload the updated wp-config.php
Step 5: Test Before Going Live (Zero Downtime Trick)
Before changing your DNS, test the new site by editing your local hosts file to point your domain to the new server’s IP address. This lets you browse the new site in your browser without affecting live visitors.
- Mac/Linux: Edit
/etc/hosts— addNEW_SERVER_IP yourdomain.com - Windows: Edit
C:\Windows\System32\drivers\etc\hosts— add the same line - Browse your domain — you’ll see the new host’s version while live visitors still see the old one
- Test everything: pages, navigation, images, contact forms, checkout (if WooCommerce)
Step 6: Switch Your DNS (Go Live)
Once you’ve confirmed the new site works correctly, update your DNS to point to the new server.
- Log in to your domain registrar (Namecheap, GoDaddy, Cloudflare, etc.)
- Update the A record for your domain and www subdomain to the new host’s IP address
- DNS propagation takes 1–48 hours worldwide, though most visitors see the change within 1–4 hours
- During propagation, some visitors will hit the old server and some the new — both should work since the data is identical
Step 7: Update SSL Certificate
- Install a new SSL certificate on your new host (most managed hosts do this automatically)
- If using Let’s Encrypt on a cPanel host, run the SSL installation from the control panel after DNS propagates
- Verify HTTPS is working by visiting
https://yourdomain.com
Step 8: Cancel Your Old Hosting
Wait at least 48–72 hours after DNS propagation before cancelling your old host — this ensures any visitors who saw the old DNS records have been redirected. Once you’re confident traffic is fully migrating to the new host, cancel the old account. Download one final backup from the old host before cancellation as a safety measure.
Common Migration Problems & Fixes
| Problem | Cause | Fix |
|---|---|---|
| White screen of death after migration | PHP version mismatch or plugin conflict | Check PHP version on new host matches old; disable plugins via FTP |
| Images not loading | Incorrect file permissions or wrong upload path | Set wp-content/uploads to chmod 755; check wp-config.php paths |
| Login redirect loop | WordPress URL setting mismatch | Update siteurl and home in wp_options table via phpMyAdmin |
| Mixed content warnings (HTTP/HTTPS) | Hard-coded HTTP URLs in database | Use Better Search Replace plugin to update all URLs in database |
| Emails not sending | New server’s SMTP not configured | Install WP Mail SMTP plugin and configure with your email provider |
Which Hosts Offer Free Migration?
If you’d rather skip the DIY process entirely, these hosts will migrate your site for free:
Last updated: May 30, 2026. Migration steps tested on WordPress 6.x with current versions of Duplicator and All-in-One WP Migration plugins.